Recover database from SUSPECT mode
The database can be recovered by any of the following methods: restoring or using emergency repair.
Method 1: Restore database from last clean backups.
The obvious option. If you have clean backups available, use them to restore a fresh database. There are many articles available online which help you to restore a SQL Server database.
Method 2: Perform EMERGENCY mode repair.
In this method, we will use DBCC CHECKDB to recover the database from SUSPECT mode. This method must be used as a last resort because there are chances of data loss. Here is a step-by-step process to repair a database
Step 1: Set the Database to Emergency Mode
When a database is in SUSPECT mode, we cannot access it, hence first we must change the mode of the ComputerShopInventory database from SUSPECT to EMERGENCY. To do that, execute following query:
ALTER DATABASE [ComputerShopInventory] SET EMERGENCY;
Step 2: Verify Database Integrity
Run the DBCC CHECKDB command to find the corruption level in the database. Execute following query.
DBCC CHECKDB (‘ComputerShopInventory’);
Query output
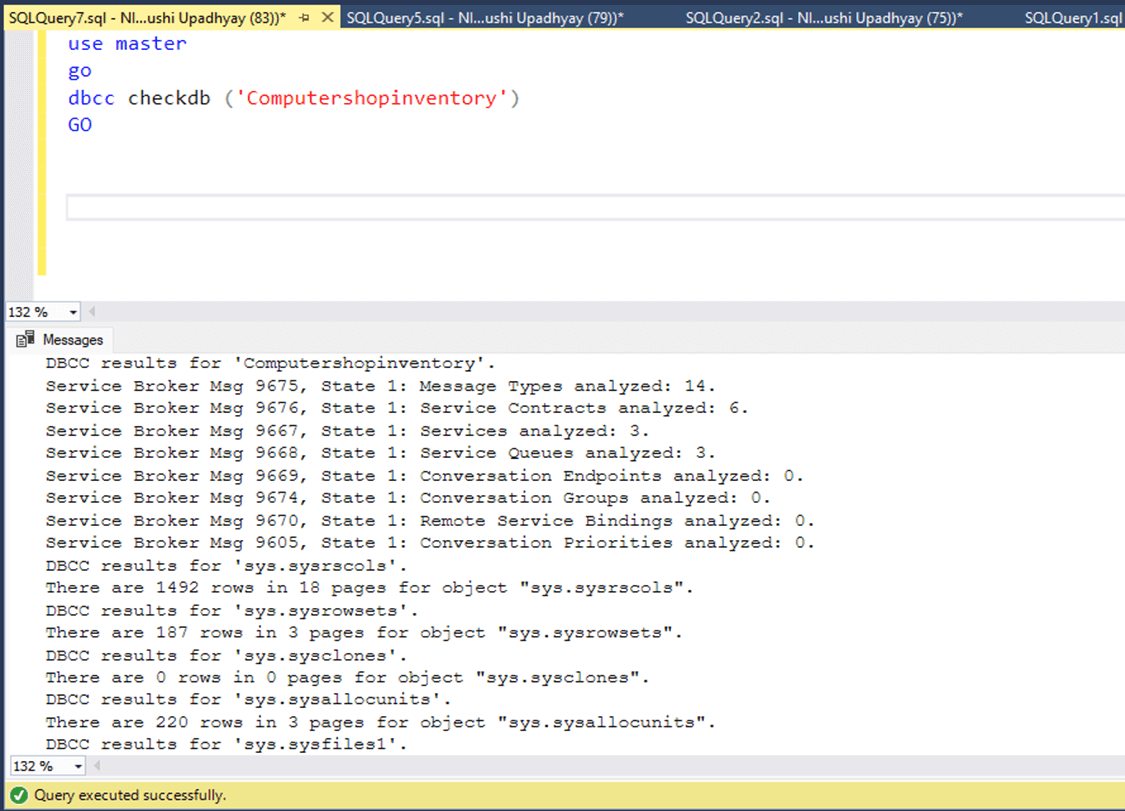
As you can see, the DBCC CheckDB did not return any error. Let us try to set it online.
ALTER DATABASE [ComputerShopInventory] SET ONLINE;
We have encountered following error
Msg 5181, Level 16, State 5, Line 7
Could not restart database "Computershopinventory". Reverting to the previous status.
Msg 5069, Level 16, State 1, Line 7
ALTER DATABASE statement failed.
Msg 824, Level 24, State 2, Line 7
SQL Server detected a logical consistency-based I/O error: incorrect checksum (expected: 0xa7cdcef8; actual: 0x2315fee1).
It occurred during a read of page (2:0) in database ID 7 at offset 0000000000000000
in file 'C:\Program Files\Microsoft SQL Server\MSSQL16.MSSQLSERVER\MSSQL\DATA\Computershopinventory_log.ldf'.
Additional messages in the SQL Server error log or operating system error log may provide more detail.
This is a severe error condition that threatens database integrity and must be corrected immediately.
Complete a full database consistency check (DBCC CHECKDB). This error can be caused by many factors; for more information, see SQL Server Books Online.
So now, we must run the consistency check on the entire database to rebuild the transaction log.
Step 3: Repair the Database
Before we begin the repair process of database, we must put it in single_user mode otherwise, you will encounter following error:
Msg 7919, Level 16, State 3, Line 1
Repair statement not processed. Database needs to be in single user mode.
Now, execute the query below to set database in single_user mode.
ALTER DATABASE [Computershopinventory] SET SINGLE_USER WITH ROLLBACK IMMEDIATE;
Once the database is in single_user mode, we will use DBCC CheckDB command with REPAIR_ALLOW_DATA_LOSS option. Here is the query.
DBCC CHECKDB (‘Computershopinventory’, REPAIR_ALLOW_DATA_LOSS);
The output is shown here:
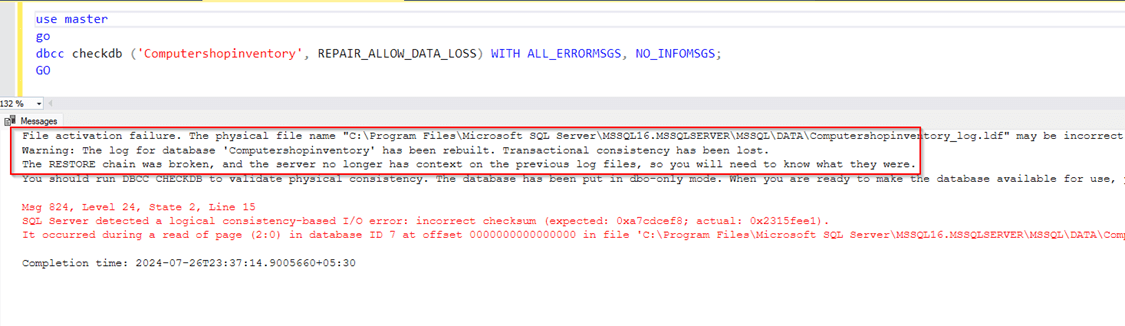
As you can see in the above image, the transaction log has been rebuilt. Let us set the database online and make it accessible for all users. Execute following set of queries.
Use master
go
alter database Computershopinventory set online
Go
Alter database Computershopinventory set multi_user
go
Check the database status using the following query.
use master
go
select DATABASEPROPERTYEX('Computershopinventory','status')[Database Status]
go
Output:

As you can see in the above screenshot, the database is repaired and accessible to users.
Conclusion
The outage gave us an opportunity to revisit the backup strategy and start considering the investment in professional data recovery tools. Regular backups and proactive monitoring can help prevent databases from entering such outage and data loss. Manual methods offer a basic solution but may not always be effective and can lead to data loss. Stellar Repair for MS SQL provides a robust and reliable alternative, ensuring comprehensive recovery without data loss. suspect mode. You can refer to this article to learn more about it.